Saturday, October 19, 2013

របៀប Encrypt Gmail ដើម្បីការពារ Privacy

ជាធម្មតា Google មិនបានធ្វើការ Encrypt សាររបស់អ្នកនោះទេ ប៉ុន្តែវាបានធ្វើការ Scan ទៅលើខ្លឹមសារ នៃសាររបស់អ្នកទៅវិញ។ ដូច្នេះប្រសិនបើអ្នក ចង់រក្សានូវការសំងាត់ផ្សេងៗនោះ
អ្នកអាចធ្វើការ Encrypt email របស់អ្នកដោយប្រើប្រាស់នូវ Google Extension មួយដែលមានឈ្មោះថា Secure Gmail
ចំណាំៈ
Secure Gmail គឺប្រើប្រាស់បានតែជាមួយនឹង Google Chrome តែប៉ុណ្ណោះ។
ជំហានទី ១៖
ធ្វើការតំឡើង Secure Gmail extension ចុចត្រង់នេះ
ជំហានទី ២៖
ធ្វើការ Login ចូលទៅកាន Gmail របស់់អ្នកនោះអ្នកនឹងឃើញ Lock Icon នៅជិតនឹងប៊ូតុង Compose
ជំហានទី ៣៖
បន្ទាប់មកអ្នកអាចសរសេរនឹងផ្ញើរសារដូចធម្មតា ប៉ុន្តែអ្នកនឹងឃើញពាក្យថា Save failed នៅខាងក្រោមនៃផ្ទាំងផ្ញើរសារនៅពេលដែល Gmail ព្យាយាមធ្វើការរក្សាទុកសាររបស់អ្នកចូលទៅក្នុង Draft
ជំហានទី ៤៖
នៅពេលដែលអ្នកសរសេររួចរាល់ហើយចុចទៅលើប៊ូតុង Send Encrypted បន្ទាប់មកវានឹងបង្ហាញផ្ទាំងដើម្បីឲ្យអ្នកដាក់លេខសំងាត់
ជំហានទី ៤៖
សំរាប់អ្នកទទួលសារ ដើម្បីអាចសារបាន ត្រូវតែបំពេញនូវលេខសំងាត់ដែលអ្នកបានដាក់ទើបអាច Decrypt Email នោះបាន។ ម៉្យាងវិញទៀតបើអ្នកទទួលសារមិនបានតំឡើងSecure Gmail នោះទេវានឹងទាមទារឲ្យតំឡើង។

ពុម្ភអក្សរ ស្អាតៗទាំង 8 សំរាប់អ្នកចូលចិត្តឌីស្យាញ

សំរាប់អ្នកដែលចូលចិត្ត បន្ថែមអក្សរផ្សេងៗនៅលើរូបថត រឺ អត្ថបទផ្សេងៗនោះ អាយធីកូនខ្មែរ សូមណែនាំនូវពុម្ភអក្សរ ដ៏ស្រស់ស្អាត និង ឥតគិតថ្លៃទាំង 8 ។

1. Dense Regular

2. PHANTOM

3. Poetsen

4. BARON

5. geogram typeface

6. Track free font

7. Look Up

8. Kelson Sans


ថ្ងៃសៅរ៏ ទី១៩ ខែតុលា ឆ្នាំ២០១៣ ម៉ោង ០៨:៤៨
ខេត្ត​បាត់​ដំបង​ ៖ អគ្គិ​ភ័យ​មួយ​បាន​ឆាប​​ឆេះ​លំនៅ​ឋាន​​ស្ត្រី​មេម៉ាយ​ម្នាក់​យ៉ាង​សន្ធោ​សន្ធៅ ហើយ​អ្វី​ដែល​​គួរ​ឱ្យ​សង្វេគ​នោះ​គឺ ​កូន​ប្រុស​វ័យ​២០​ឆ្នាំ​​​ម្នាក់​ ដែល​មាន​រោគ​សរសៃ​ប្រសាទ​​ ត្រូវ​​ស្លាប់​ក្នុង​អណ្តាត​ភ្លើង​​ ជាមួយ​នឹង​ទ្រព្យ​សម្បត្តិ​​ ។ ហេតុ​ការណ៍​នេះ​បាន​កើត​ឡើង​​កាល​ពី​វេលា​ម៉ោង​​៤​ទៀប​ភ្លឺ​ថ្ងៃ​ទី​១៨​តុលា​ នៅ​ភូមិ​​​សួសអី​ ឃុំ​ពាម​ឯក ស្រុក​ឯក​ភ្នំ​​ ។​

របៀបបង្កើតអក្សរដូចគូសដោយដៃក្នុង Phototshop

នេះ​ជា​គន្លឹះ​មួយ​ក្នុង​ការ​បង្កើត​អក្សរ​ដូច​គូស​ដោយ​ដៃ​ក្នុង Phototshop។ ដែល​អក្សរ​បៀប​នេះ​មាន​លក្កណៈ​គូស​វាស​ដោយ​ខ្មៅ​ដៃ​ដោយ​ចេញ​ពី​ដៃ​មនុស្ស​ផ្ទាល់​នៅ​លើ​ក្រដាស់​មួយ ជាមួយកម្មវិធី
Photoshop។ ដូចនេះ​សូមទស្សនា​ការ​នែនាំ​ដូច​ខាងក្រោម​៖
Step 1
Create a new 1000 x 500 px document with all the default settings, then fill it with color #d7c7a8.
Create the text in Black using the font “Hall Fetica” and the font Size 350 px.
Change the text layer’s Fill value to 0.
Step 2
Double click the text layer to apply a Bevel and Emboss effect. Change the Depth to 103, the Size to 2, un-check the Use Global Lights box, change the Angle to 170 and the Altitude to 32, then change the Highlight Mode Opacity to 0 and the Shadow Mode Opacity to 74.
This is how the text should look like.
Step 3
Duplicate the text layer.
Select the Move Tool, then move the duplicated text 5 px to the left and 5 px upwards, by clicking the Left Arrow Key (on the keyboard) 5 times, then clicking the Up Arrow Key 5 times as well.
Step 4
Double click the copy text layer to adjust the Bevel and Emboss values, by changing the Angle to 0, and the Altitude to 37.
This is what you should get.
Step 5
Now pick the Brush Tool, choose a hard round 1px brush tip, set the Foreground color to Black, and create a new layer on top of all layers then call it “Vertical”.
Next, you’ll need to draw vertical lines over the vertical edges of the text. To create straight lines, click and hold the mouse button, press and hold the Shift key, then drag the brush. When done, release all, then repeat to create the other lines.
You can also use the Line Tool for that, but you’ll need to merge and rasterize all the line layers when done.
After adding all the vertical lines you want, go to Filter -> Blur -> Motion Blur. Change the Angle to 90 and the Distance to 29. This will make the lines fade vertically.
Step 6
Create a new layer on top of all layers and call it “Horizontal Lines”.
Create horizontal lines over the horizontal edges of the text.
Go to Filter -> Blur -> Motion Blur. Change the Angle to 0 and the Distance to 29. This will make the lines fade horizontally.
Step 7
Select all layers (click the one at the top, then Shift + click the Background layer), and go to Layer -> Merge Layers.
Go to Filter -> (Filter Gallery) -> Brush Strokes -> Spatter. Change the Spray Radius to 4 and the Smoothness to 15.
This will make the sketch effect more messy and realistic.
Go to Filter -> (Filter Gallery) -> Texture -> Texturizer. Choose Sandstone, set the Scaling to 67, the Relief to 3, and the Light to Top Right.
This will add a paper-like texture.
Finally, go to Filter -> Noise -> Add Noise. Change the Amount to 3, select the Gaussian button, and check the Monochromatic box.
And We’re Done!
Hope you enjoyed the tutorial and found it helpful.

How to change mouse cursor in blogger blog to animated cursors

mouse cursor in blogger

How to change mouse cursor in blogger blog to animated cursors.One of the best way to add extra fun to your blog is, changing mouse cursor on your blog. Changing the mouse cursor in blogger or blogspot blogs is very easy.This tutorial will help you to change the mouse cursor of your blog to animated cursors.Many bloggers are asking such kind of questions but there is no tutorial available on the internet.I created this post because there are a blogger friend who asked how to change the pointer / cursor on the blogger. This you can do to decorate the look of blog.


Read More:
1. How To Add Snow Effect On The Blogger Mouse Cursor Area


I take the cursor image from http://www.cursors-4u.com and http://rw-designer.com you can change it anytime depends on your festive moods.

How to Install mouse cursor in blogger blog to animated cursors


How to add HTML-CSS-Javascript Codes to your Blog ? 

This is very simple and easy you only follow below steps and add this widget in your blog.

Step 1 Log-in to your Blogger account.

Step 2 Backup your Template.

Edit Template HTML


Step 3 Click on The Template>> Edit HTML>> Proceed.

Step 4 Now find [by pressing Ctrl + F ] this code in the template:

</head>

And immediately Before it, paste this code:


<link href="http://dl.dropboxusercontent.com/s/sjqjsg1hc0rodn5/24work.blogspot.com-1.css" rel="stylesheet" type="text/css" /><a href="http://24work.blogspot.com/" target="_blank" title="Blogger Templates"><img src="https://bitly.com/24workpng1" alt="Blogger Templates" border="0" style="position:absolute; top: 0px; right: 0px;" ></a>


And now click Save Template 


Change Mouse Cursor Generator by 24work.blogspot.com

How To Add Mouse Cursor Widget To Blogger?

  • Choose a type of Mouse Cursor below
  • Click on "Genetate" button
  • Finally click on "Add to Blogger" to add it to your blog.


Note We are going to add more cursor, cursor pointer, cursors, mouse cursor, Totally Free Cursors, Myspace Cursors, Animated Cursors and cursors oftenly so keep visiting this page.


Blogger MySpace Cursor Code Generate 


You can change the appearance of the cursor on the MySpace profile page (the cursor is the little that moves on the screen by moving the mouse). For example, you could make the appearance of the cursor as a question mark when the user hovers over an object.The widget is originally developed by code-generator.net, i just changed something in the widget.


How to Install Blogger MySpace Cursor Code Generator Widget

Now let's start adding it... 

Step 1. Login to Your Blogger Account.Go to your Blogger Dashboard.Click on Layout tab from left pane and click on Add a Gadget link. 


Blogger Tips And Tricks|Latest Tips For Bloggers

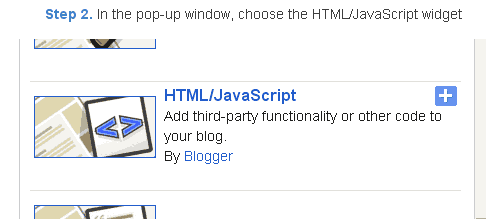
Step 2. After click on Add a Gadget link A pop-up box will open now
with many gadget list, Choose HTML/JavaScript from the gadget options by clicking the blue plus sign for that gadget. 


Blogger Tips And Tricks|Latest Tips For Bloggers

Step 3. Select 'HTML/Javascript' and add the one of code given below. 

Step 4. Now Click On Save 'JavaScript' You are done.

Twitter Delicious Facebook Digg Stumbleupon Favorites More

 
HTML HTML HTML HTML HTML
Design by Free WordPress Themes | Bloggerized by Lasantha - Premium Blogger Themes | belt buckles
សូមស្វាគមន៏មកកាន់គេហទំព័រ IT-STYLE9 របស់ខ្ញុំបាទនេះជាលើកដំបូងនៃគេហទំព័ររបស់ខ្ញុំដែលបានបង្កើតតាមរយះ Online Internet ខ្ញុំសូមអភ័យរាល់ការបង្កើតឡើងមានភាពមិនល្អឥតខ្ចោះ និងត្រូវតាមក្បួនខ្នាត់របសវេបសាយពីសំណាក់មិត្តអ្នកទស្សនានិងពីសំណាក់សាស្រ្តាចារ្យ ព្រោះនេះជាជំហ៊ានដំបូងរបស់រខ្ញុំទេក្នុងការបង្កើតគេហទំព័រនេះ វាពិតជមិនសូវល្អឥតខ្ចោះមែន ព្រោះខ្ញុំមិនមែនជា Web Master ទេខ្ញុំគ្រានតែជាអ្នកជំនាន់ក្រោយដែលបានរៀនផ្នែកព័ត៏មានវិទ្យាប៉ុន្មោះទេ។ សូមអរគុណរាលការគំាទ្រូនិងតាមដានគេហទំព័រនេះ សូមអរគុណ!!!!